
Saturday 18 December 2010
Risk Assessment
Thursday 16 December 2010
Fading two bits of footage together
Here I am going to analyse how I was able to fade two pieces of footage into one another.

First of all I had to make sure that the bits of footage I wanted to fade in with one another overlapped slightly so that I would be able to make them fade as at the end of each clip the opacity fades allowing the opacity to increase on the clip that comes after it
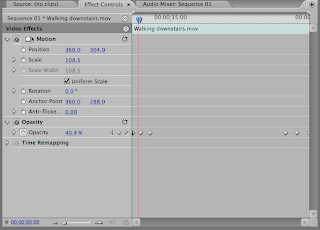
The second step that was required was to open up the opacity option. I then positioned the cursor to where I wanted to change the opacity, i then clicked on the little diamond shape on the opacity option, this allowed me to change the opacity by then clicking on the blue number and changing it, I did this three times evenly across the overlapped bit at the end of the footage. I had to decrease the opacity when fading out and increase the opacity when fading in again. The fading was three diamonds in the overlapped footage 100%, 50% and 0%

First of all I had to make sure that the bits of footage I wanted to fade in with one another overlapped slightly so that I would be able to make them fade as at the end of each clip the opacity fades allowing the opacity to increase on the clip that comes after it


The second step that was required was to open up the opacity option. I then positioned the cursor to where I wanted to change the opacity, i then clicked on the little diamond shape on the opacity option, this allowed me to change the opacity by then clicking on the blue number and changing it, I did this three times evenly across the overlapped bit at the end of the footage. I had to decrease the opacity when fading out and increase the opacity when fading in again. The fading was three diamonds in the overlapped footage 100%, 50% and 0%
Effects used when making the video
 On the left hand side of the page there is an example of how I cropped two bits of film into one image.
First of all I cut down the footage that I wanted to use so that it would fit in the video and then i dragged the next piece of footage on to the row above so it was in line with the other one. I made sure it was in time otherwise one of the bits of video would have run over and would have been out of time with the song.

The next step was to open up the effects, click on the drop down option that was video effects, go down to the transform option click on that drop down option and the crop effect was in there. I then dragged the crop onto both bits of footage so I could adjust both of them.

 Step three involved clicking on the footage on the timeline so that I knew that it was selected, the box next to the film appeared with different options involving how I would want to edit the film, in the end I clicked on crop which dropped down four options, top, bottom, left and right I only needed the left and right options so i opened them up, it opened up a scale from 0.0 - 100.0, I then moved the scale to where I wanted it positioned so that I could get the right position of the film
 Thursday 14 October 2010
Production Schedule
Beneath is the production schedule that I wish to stick to throughout the project.


The production schedule is another important piece of planning work that needs to followed. I have put 4 days aside in which I want to complete all of the filming. I will try to stick to this plan as it is important to keep organised otherwise things may start to take to long and start to become confusing, which will result in me not finishing the filming in time.
Assets List
Beneath is a list of necessities that I require to film my music video.
 These are the important assets that I need to help me film my music video. For example the guitar and drum kit are quite an obvious asset as I need them for the band to play as you can hear the drums and guitar in the song. Whereas the less obvious assets are possibly a toothbrush and a towel as you wouldn't think that I would have to use them but for my filming it is quite important that I have them as i have planned to film the video with them in.

Thursday 7 October 2010
Analysis of CD Covers
Below are three different CD album covers, front and back and also the CD itself. I included the band that I want to use for my final video as I feel that it would have given me some ideas of how I should lay out my final Digipak. I also included Tinie Tempah's new album 'Disc-overy'. I also analysed MIA's album Kala, as both Tinie Tempah and MIA have colourful and vibrant Digipaks.
1. Tinie Tempah - Disc-Overy, I analysed this album as I had previously analysed the music video 'Written in the Stars' by Tinie Tempah this made it easier for me to analyse. I was able to analyse techniques much quicker than what I would have been able to if I chose another album.
2. MIA - Kala, again I had previously analysed a song from this album, which gave me an idea of how to analyse the CD cover. I also chose this album as it is a very vibrant and stands out, which makes it easier to analyse.
3. U2 - How to dismantle an Atomic Bomb, this is the final album that I decided to analyse this album as this is the band that I will be using when I make my final video. Although it is not the album that includes the song that I want to use for my final video but this album does give me some ideas for my final digipak

Wednesday 6 October 2010
Stll Images of Storyboard for Video
Here are my storyboard drawings of how I want my video actually set out, however these are only guidelines and could change if I feel there is a better way to film a certain piece. With the drawings I have put small notes underneath to help remind myself of actions the actor and the camera have to make when filming the video. I have also put speech bubbles on the post it notes so that I also know what parts that the singer will be singing.


Tuesday 5 October 2010
Animatic Storyboard Video
Above is the animatic storyboard of how I want my video set out and the different camera angles that I am looking to use. The seconds in between each cut represents how long each cut will actually be when I go and film the video.
When I created the animatic storyboard I was required to use a video camera to capture the images, I did this by attaching the camera to a tripod and tilting the camera forward so that it was facing the desk. I placed the sheets on the desk and looked through the camera to ensure that the correct post it note was in the frame. After i filmed the first one I paused the film and slid the sheet along to the next post it note. This procedure took about a lesson to complete.
Monday 4 October 2010
Music Video Analysis - Written in the Stars Tinie Tempah
Above is the video Written in the Stars by Tinie Tempah and the video shows the audience the experiences he felt when he was growing up as a young boy. Alot of the lyrics relate to the visual that Tinie Tempah is performing. Overall the video is partly narrative based because it is telling the story of a young boy, and also partly concept based because that young boy is supposed to be Tinie when he was younger.
Below is my full video analysis of the video Written in the Stars, here I have combined both text and images to analyse the video.

Music Video Analysis - Paper Planes MIA
Above is the video paper planes which is sung by MIA. This is the first video that I chose to analyse for my music video analysis. In order for me to create an acceptable analysis, I was required to answer a series of questions that relate to the video, the overall idea was to create a document that combined Images and text.
Below you are able to see my first music Video analysis, Paper Planes by MIA.

Monday 20 September 2010
Music Video Proposal
One song that i was debating over was 'Who let the Dogs Out' by the Baha Men.
http://www.youtube.com/watch?v=He82NBjJqf8One of my other choices was 'The Music Sounds Better with you' by Stardust.
http://www.youtube.com/watch?v=2Os5ihedyH8
My final choice that I have decided to go with, is 'Beautiful Day' by U2.
http://www.youtube.com/watch?v=co6WMzDOh1o&ob=av2n
I chose this song as i feel that it has more lyrics in it than the other two songs I could have chosen. This allows me to relate the lyrics more regularly to the video, whereas the other two songs do not have as many lyrics as 'Beautiful Day' so it would have been hard to make a storyline for them.
For 'Beautiful Day' I was thinking that I could have the time line of someone's day from them getting up to them going to sleep. I was thinking along the lines of splitting the song up into three sections, the first third would be the person getting up and getting ready for the day this would also be filmed at the beginning of the day, the second third would be following the person around, doing different things throughout the day this would be filmed between 11ish until 4ish, and the final third would be showing him coming home and seeing out the rest of the day this would be filmed until sunset as this is when I want the song to finish.
Some of the different ideas that I have had are that when he is getting ready I could have the first lines of the song sung, this could be as he is getting washed and ready. Another idea is when the song gets to the chorus I was thinking of having him walking down the street and having a couple of jump cuts. For example he takes two steps away from the camera and the cut, takes two more steps away from the camera this time starting further away, and then a final cut of him with a close up singing the chorus.
For other parts of the song I would want him singing into a microphone to make it look more professional with perhaps two more people playing the guitar and drum. For the first 56 seconds the song is slow so this is where i would want to fade some clips into each other as it makes it feel slower and it is more interesting than just a normal cut, the actual video 'Beautiful Day' influenced me on this.

There are lots of parts of the song where I could relate to the lyrics, especially in the first minute or so as it is slower pace. For example 'You thought you'd found a friend' I could have an extra person come in the video and that could be a little scene between the two, this could use up some of the time. On the chorus I would want to video the actor(s) singing playing drums and guitar.
Three Original Ideas
1. Baha Men - Who Let the Dogs Out?

For this track I would use 2-3 performers for the singing and possibly a group of people when the chorus is in full flow. When the chorus is being sung “Who let the dogs out” I would use a close up on one of the actors to show them singing this would be the same for some parts of the barking. When the singers are in shot I would use a low camera angle that looks up to the singers.
I would also want to include some of the actors playing the instruments within the video, I would use the instruments at school to help with this and therefore this part of the video would be inside. I would want the rest of the filming to be done outside.
2. Stardust – The music sounds better with you

For this video I would want to use 2 or 3 actors. As there aren’t many lyrics I would want there to be some sort of story line to the video. My original idea would be to have the 3 actors walking down the road having a laugh on the way to play football, and I would want this not at real speed but at a slower pace. They will then start playing football, within the video there will be clips of the actors shooting passing and tackling each other. For the camera angles I would use a side on view that follows the ball/person.
I would also use clips of a singer singing the song throughout the video. Costumes would be a football kit. I may also film people playing the instruments indoors to give some variety to the video.
3. U2 – Beautiful Day

As this song has got more lyrics to it than the other 2 songs I would probably try to relate to the lyrics more than I would with the other songs. Costumes for this song would be smart casual, parts of the vide would be at a slower pace and when it gets to the chorus it would be shown at normal pace
A2 Preliminary Task - Bad Touch Bloodhound Gang Remake
Above is the video that I created, but where the whole class took part with the acting. There were two main attributes when creating the video, this was the filming and the editing.
Just before we went out fiming we had to design a storyboard of the video so that we had a rough idea of when the cuts were and to also get the timings right. When we were filming there was various aspects that we had to focus on. We had to remain patient the whole time we filmed the video, because if we were to have got distracted we may not have been able to get as close to the original copy as we could. Another thing was that we learned to take it seriously and try not to laugh as it would have ruined the video, and I feel that we took it seriously and came out with a good quality video.
Also with filming, when I was having a turn of filming I had to ensure that the camera remained steady, to make sure the framing was exact, and I also had to film the same shot more than once to make sure that we could get a good clip. When making this video reliability wasn't a problem as the class was always in and we were able to crack on with it. It's when I will be making my own video I will need to make sure that the people I need are available.
The other attribute we had to focus on was the editing. Again with the editing I had to be patient with it as it required me to do alot of cutting and moving the certain clips, and along with the computer that kept crashing meant that I had to save regularly. I have learnt how to use a new programme, Adobe Premiere Pro, and this will allow me to edit my video for my final piece. In Premiere pro I have learnt how to cut the clips, in order for the video to flow. I have also learnt different framing techniques as well such as the motion and effects control, which is readjusting the framing. I also learnt how to import ad export certain clips and eventually exporting the whole video. I discovered how to link and unlink the clips so that i could discard the audio from what we had filmed. One of the hardest parts was to get the lip syncing spot on. This required lots of cutting to ensure that it looked like the lead singer was actually singing. Below is the original version of Bad Touch by the Bloodhound gang.
Subscribe to:
Posts (Atom)